NIFTI User Guide
admin2025-08-26T13:59:02+10:00Overview
This User Guide is designed to provide a step-by-step guide on how to operate the NIFTI System to its fullest potential.
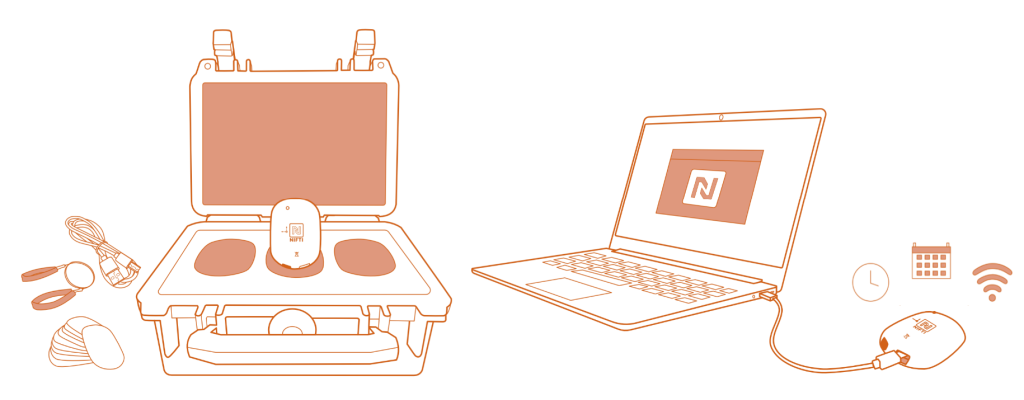
Click between each tab below to learn more about each procedure.
To discover more about the procedures, visit the NIFTI Youtube Channel @NIFTIAero
Prepare for First Use
To prepare for first use, unpack the NIFTI Sensor Node and its accessories from the Sensor Node Carry Case.
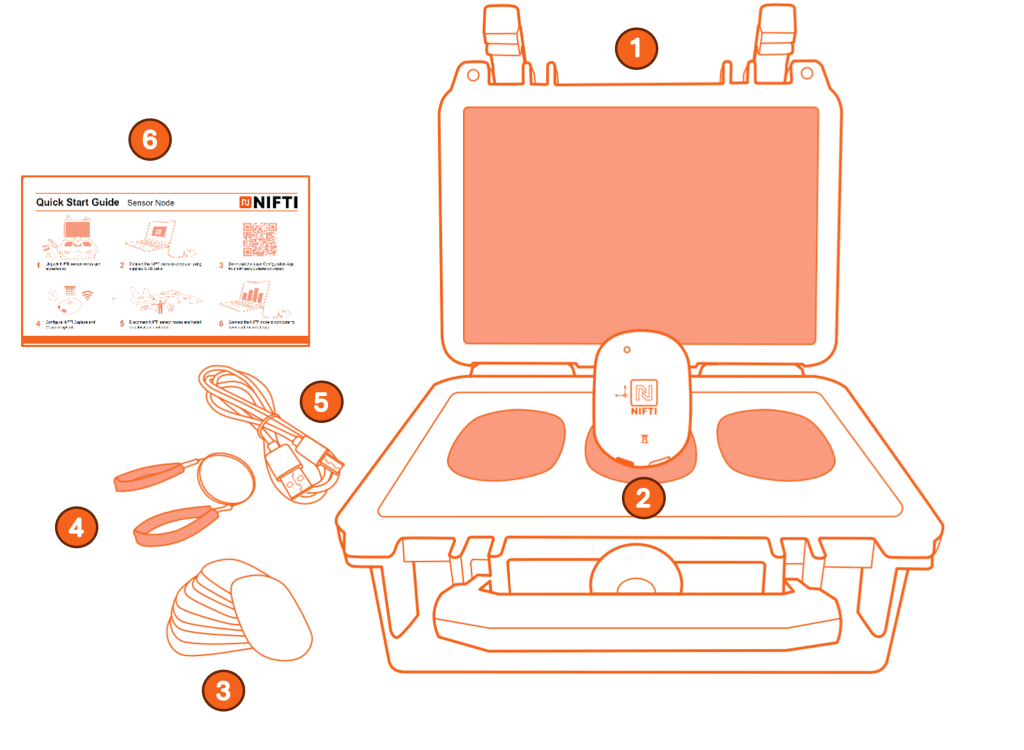
Step 1: Unpack NIFTI Starter Kit
- Sensor Node Carry Case
- NIFTI Sensor Nodes
- NIFTI Mounting Mads (three per node)
- Sensor Node Removal Tool
- Micro USB 2.0 Cables (one per node)
- NIFTI Quick Start Guide
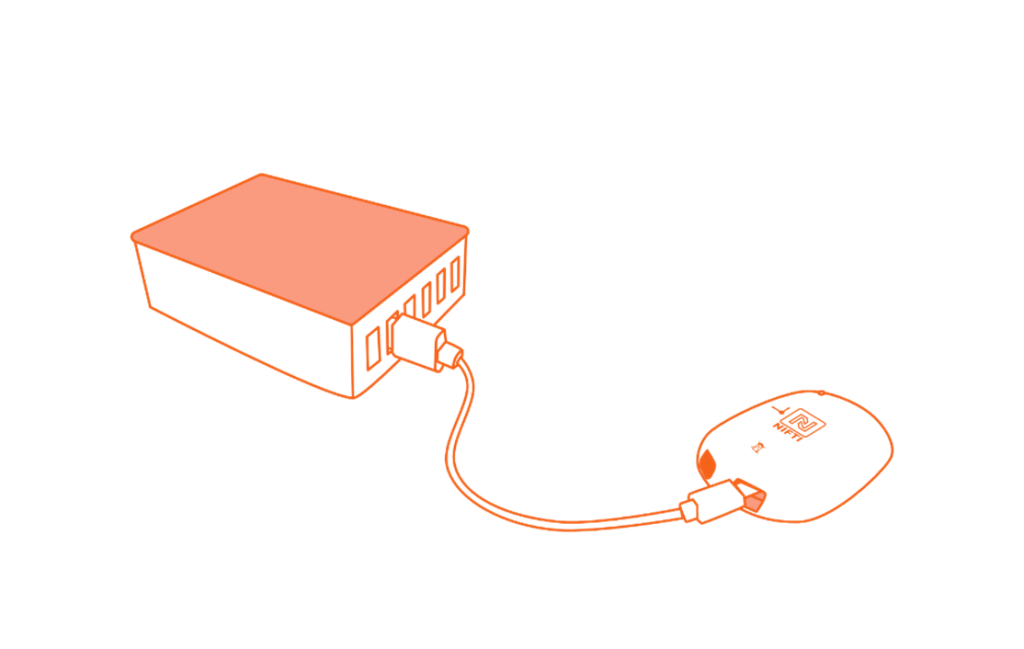
Step 2: Charge the NIFTI Sensor Node
It is recommended to charge the NIFTI Sensor Nodes for 14 hours at room temperature before first use.
Step 3: Download the NIFTI Configuration App
The NIFTI Configuration App can be downloaded by visiting NIFTI’s website https://nifti.aero/downloads/
Once downloaded, users can launch the NIFTI Configuration App after installation.
Refer to the Reference Guide for further detail
Configure NIFTI Sensor Nodes
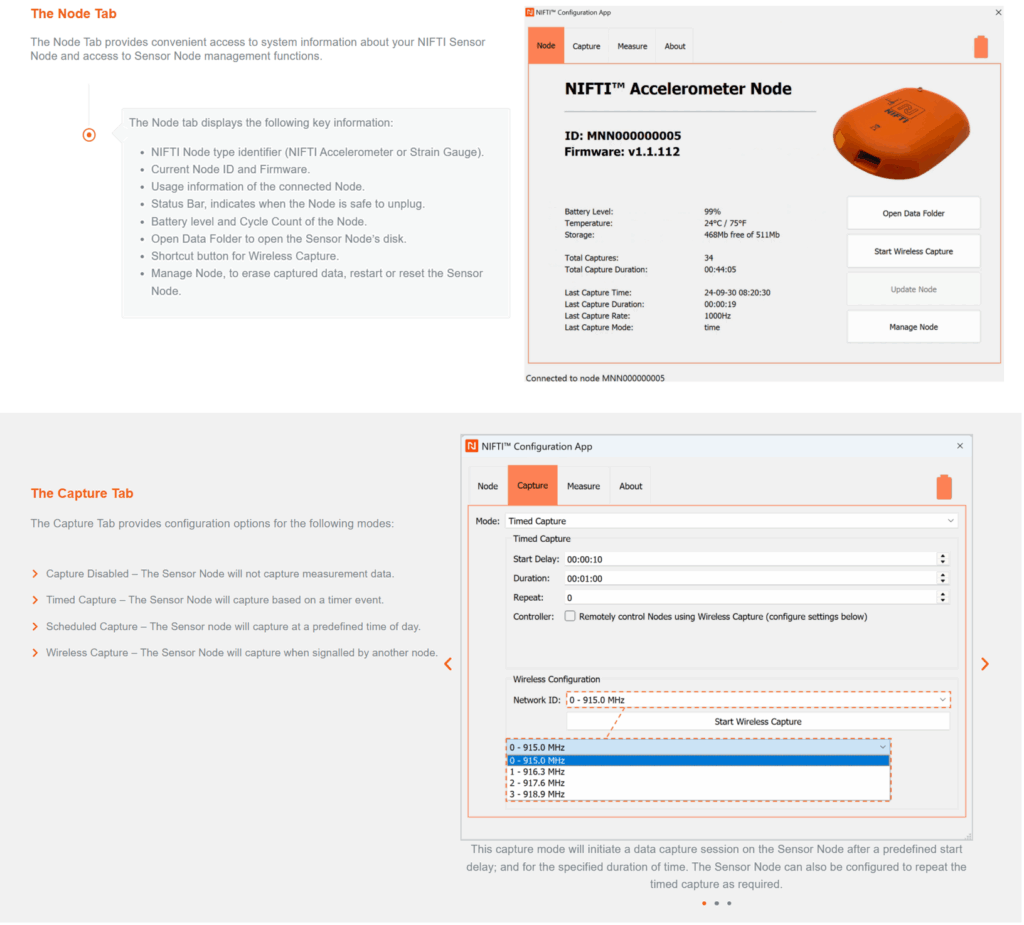
To configure your NIFTI Sensor Nodes to be used for data capture, users can use the NIFTI Configuration App.
To learn more about the NIFTI Configuration App, visit the Reference Guide to find out more about configuring NIFTI Sensor Nodes and how to configure the supported modes of operation.
Install NIFTI Sensor Nodes
To install the NIFTI Sensor Nodes for operation, the user must first determine the appropriate location.
*It is highly advised to consult with authorised personnel for both the installation of NIFTI Sensor Nodes and of the cleaning solution that is to be used on the installation location.
1.Prepare and clean the surface location* and NIFTI Sensor Nodes using a 50% IPA and distilled water solution.
2. Remove the white backing from the Mounting Pad and attach the Mounting Pad to the NIFTI Sensor Node.
3. Remove the red backing from the Mounting Pad and attach the NIFTI Sensor Node onto the surface. Apply firm pressure to set adhesion and allow curing time before operation.


Operate NIFTI Sensor Nodes
After configuring and installing the NIFTI Sensor Node onto an appropriate surface, the user can capture a session to measure physical and environmental data.
This procedure will result in the capture of data, measured from the NIFTI Sensor Nodes.
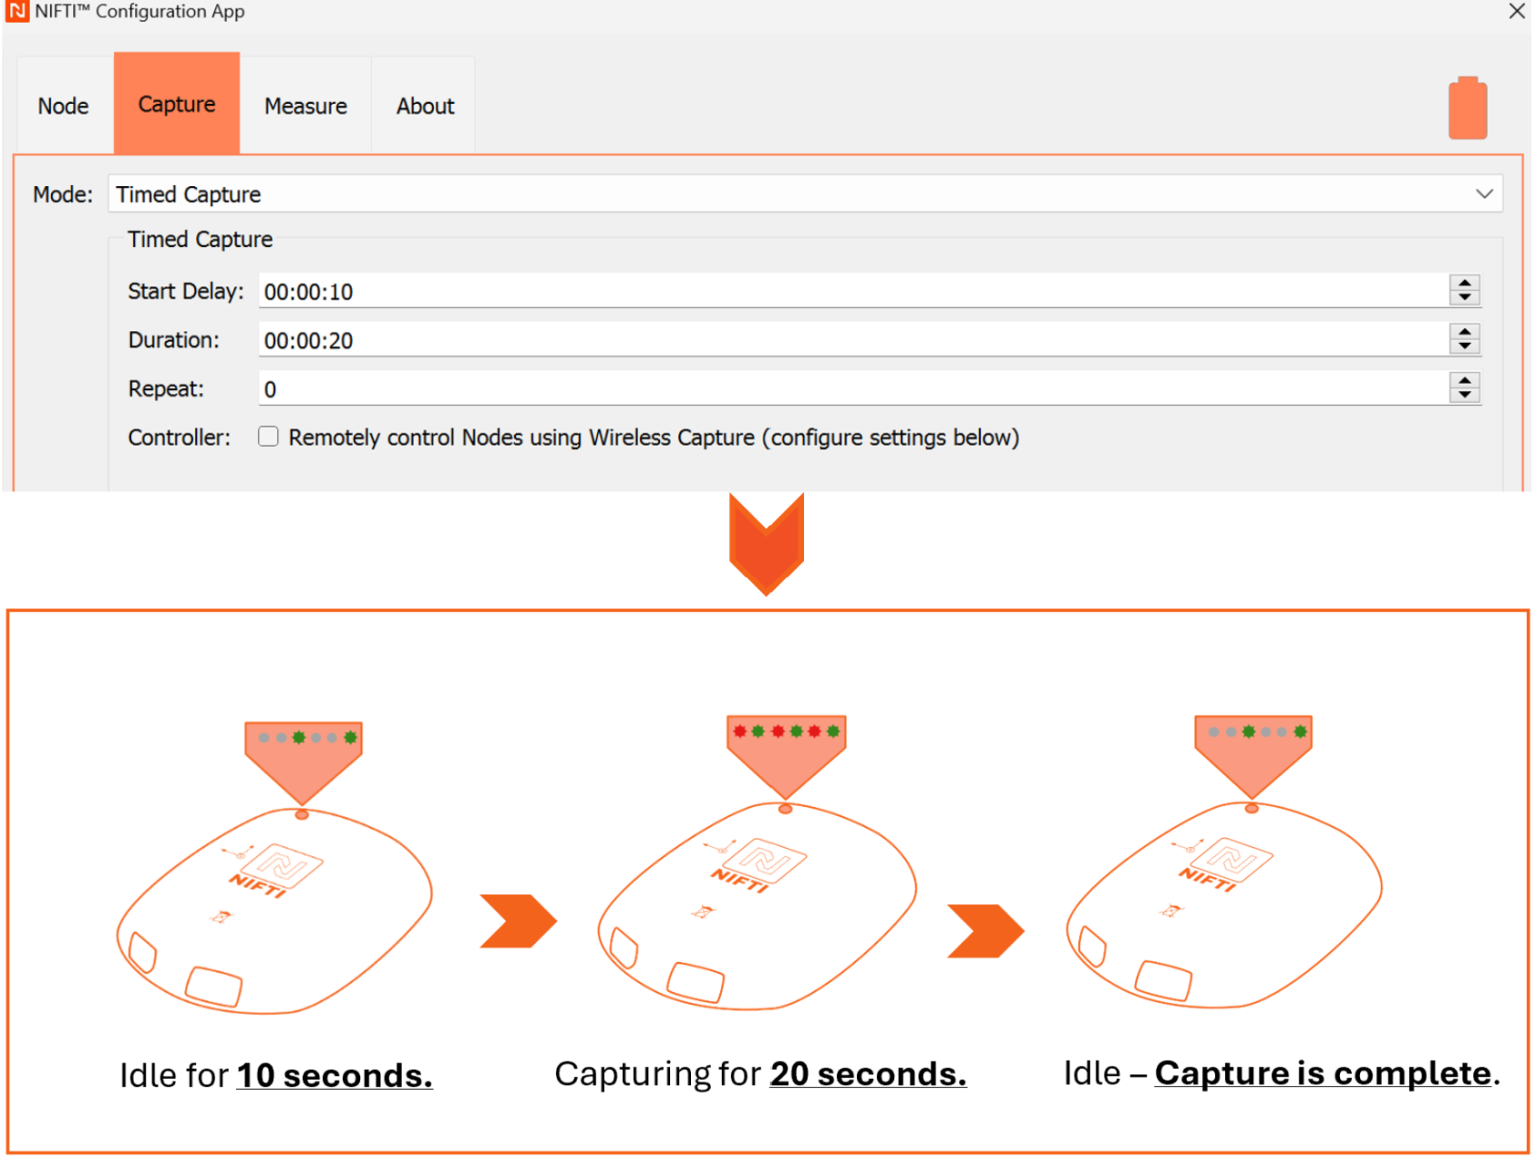
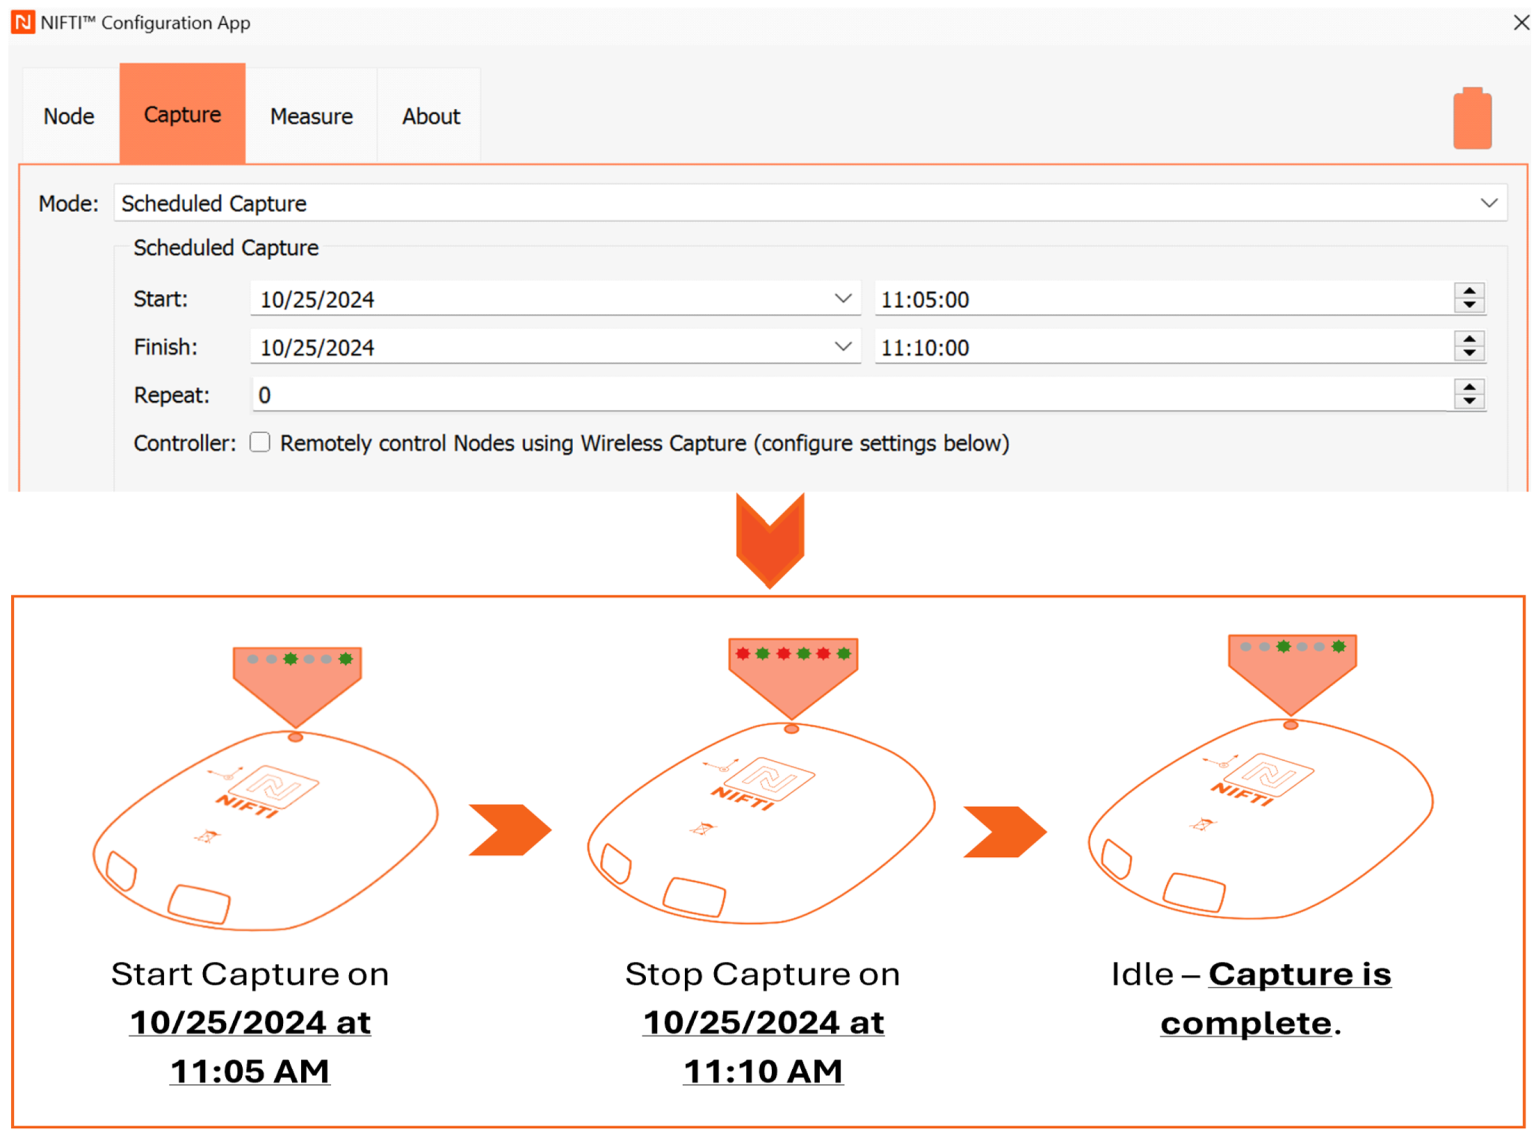
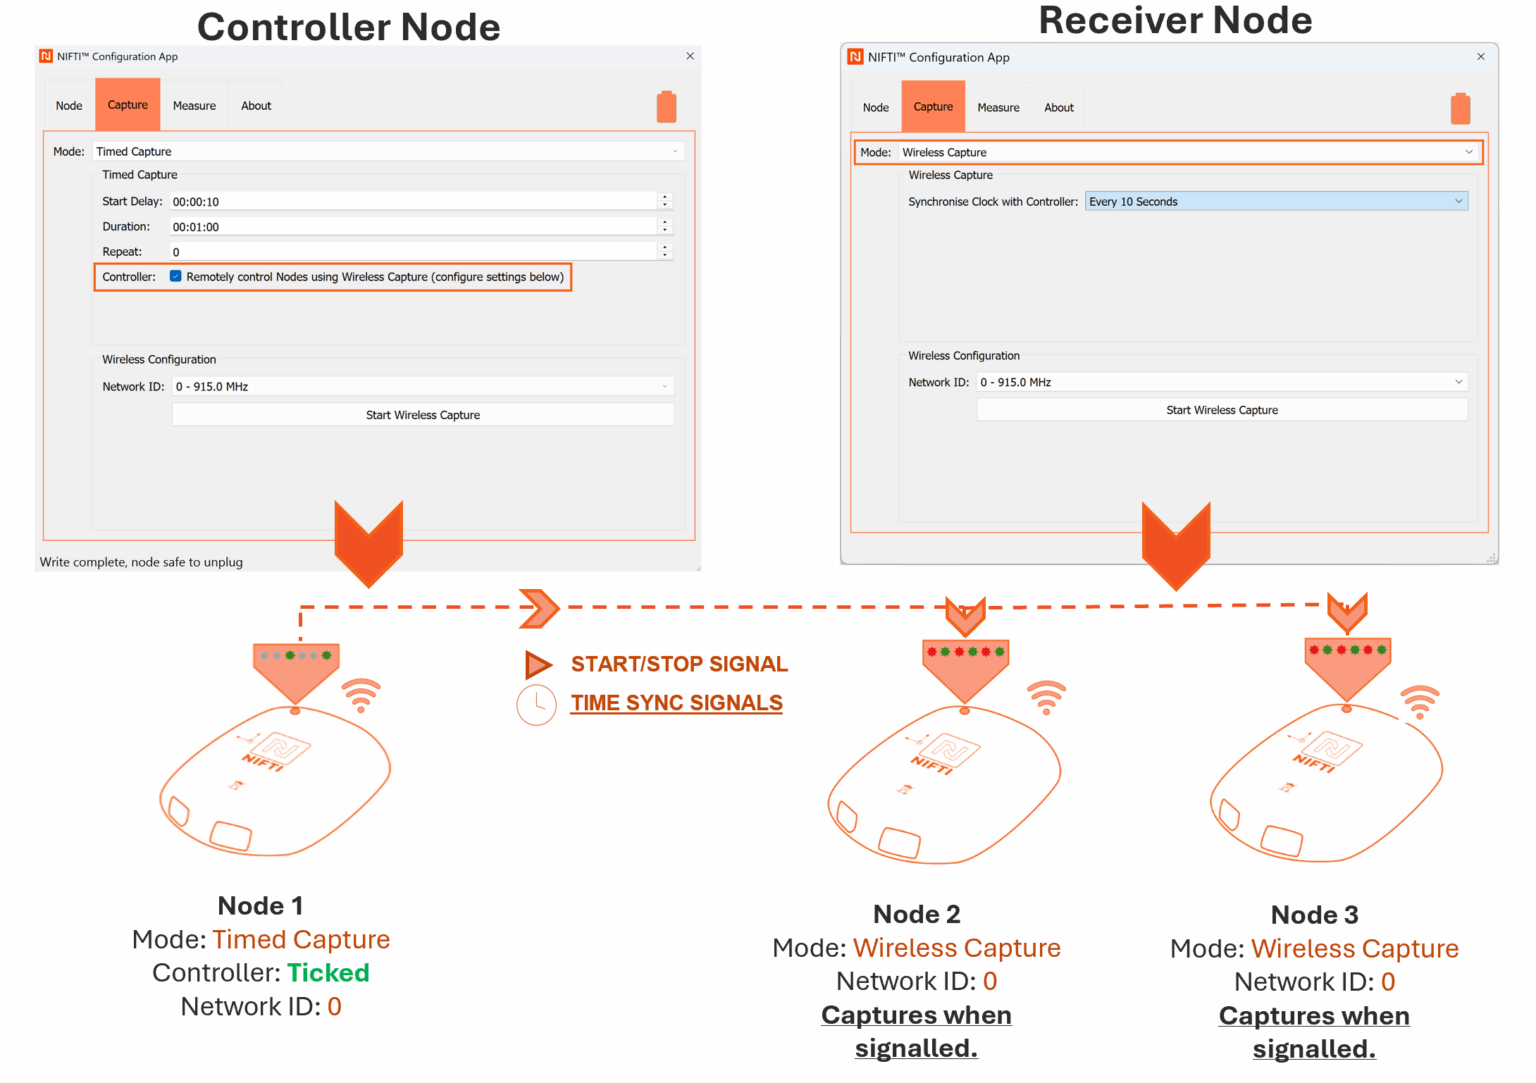
After the NIFTI Sensor Node is configured, the user can operate the Sensor Node by performing the following steps:
- Disconnect the Sensor Node from the PC to activate data capture.
- Wait for the data capture session to complete.
- Collect and analyse collected data.
Refer to the diagrams to learn more about the different modes of operation the NIFTI Sensor Node supports, based on the defined configurations.
Remove NIFTI Sensor Nodes
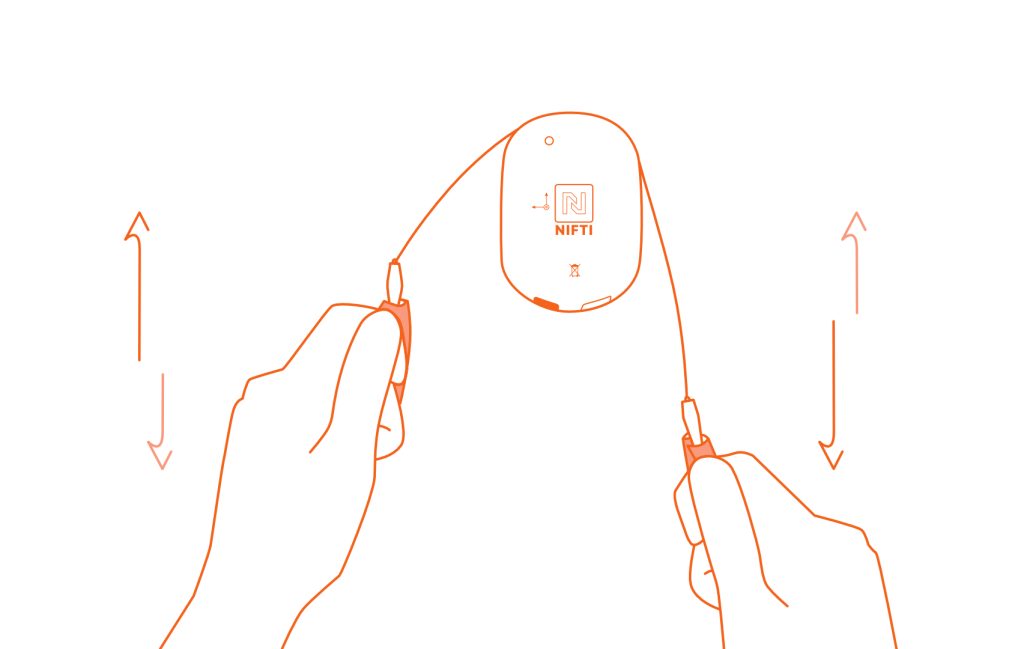
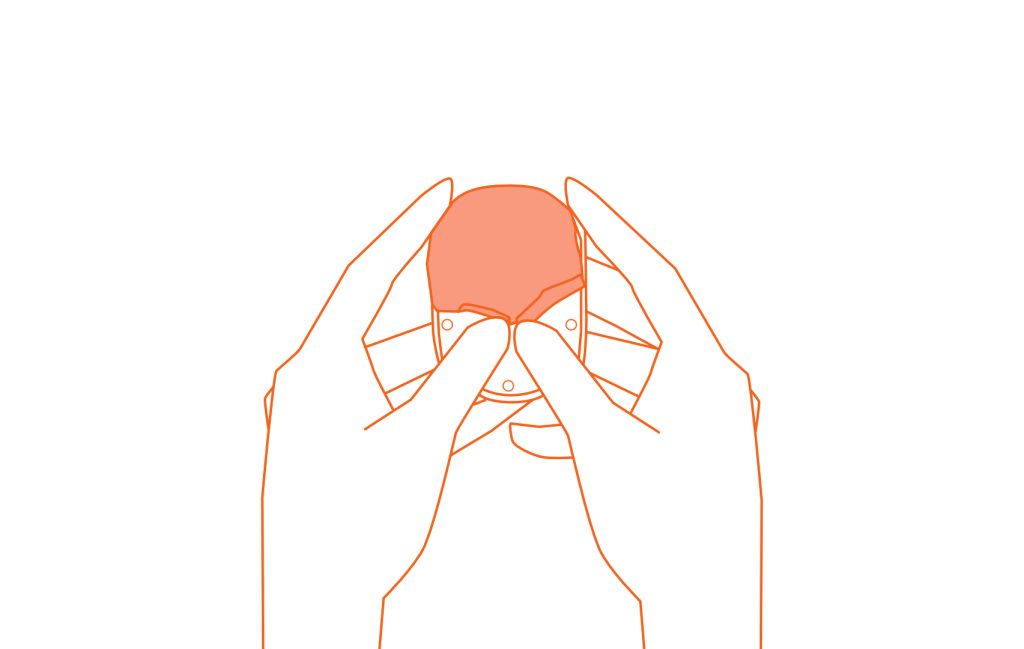
To remove the NIFTI Sensor Nodes after operation, the Node Removal Tool must be used to slide the Mounting Pad and separate the NIFTI Sensor Node from the surface.
*It is highly advised to consult with authorised personnel of the cleaning solution that is to be used on the installation location
1. Slowly saw through the middle of the Mounting Pad starting from one corner of the Sensor Node.
2. Continue in that seesaw motion until the Sensor Node is almost fully detached from the Mounting Pad, then lift the wire to separate.
3. Roll off the remaining Mounting Pad from the base of the Sensor Node and surface. Once removed, clean the surface and Sensor Node to remove excess residue.

Review NIFTI Sensor Node Data
After the capture is complete, data can now be collected to be reviewed and analysed.
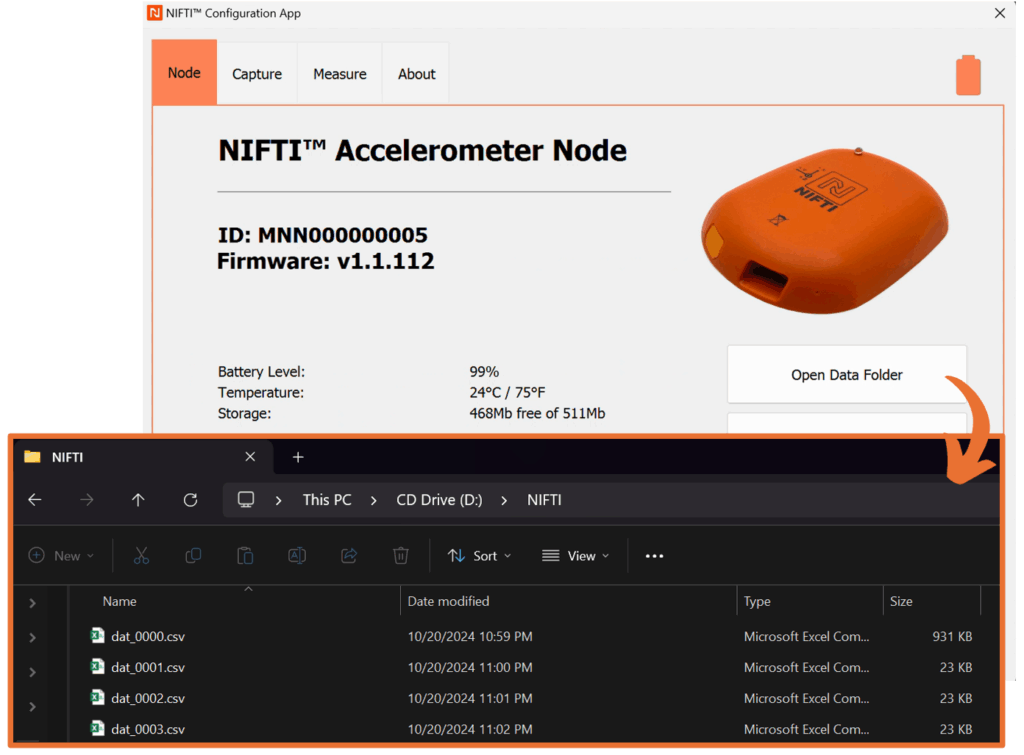
- Connect the Sensor Node to the NIFTI Configuration App to access the data
- Open the data folder
- Extract the .csv files to view the data and analyse the results
The NIFTI Accelerometer and Strain Gauge Nodes will output the following data:
- Latest capture information based on user-defined configuration options in the Capture Tab.
- Output data according to the user-defined measurement configuration options in the Measure Tab.
The NIFTI Accelerometer Sensor Node
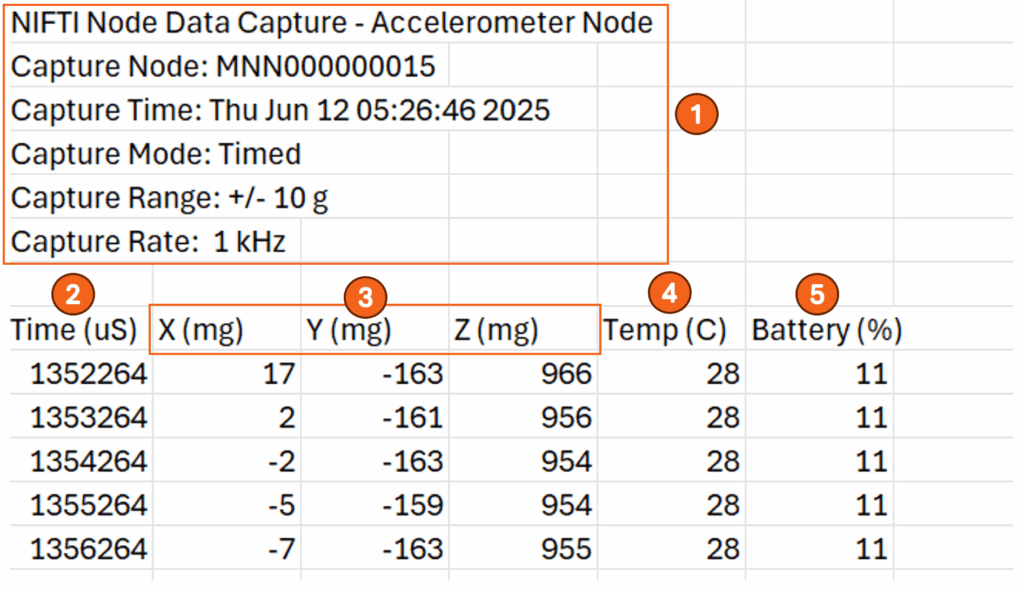
The .csv file can contain the following data:
- Sensor Node Capture information, including the capture start time (in UTC).
- The elapsed capture time in microseconds.
- Linear acceleration in the X, Y, and Z axes.
- Internal temperature during the capturing process.
- The battery levels during the capturing process.
The NIFTI Strain Gauge Sensor Node
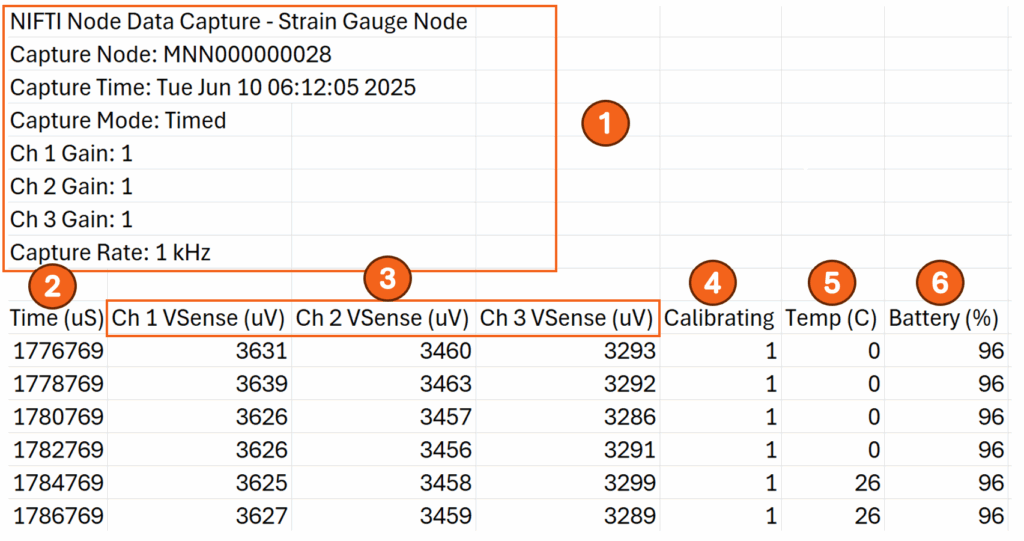
The .csv file can contain the following data:
- Sensor Node Capture information, including the capture start time (in UTC).
- The elapsed capture time in microseconds.
- The sense voltage, in microvolts, for each of the three input channels.
- The user-defined periodic calibration of the Sensor Node.
- Internal temperature during the capturing process.
- The battery levels during the capturing process.
Care and Maintain NIFTI Sensor Nodes
To maximise the longevity and durability of the NIFTI Sensor Node, it is recommended to follow the following procedures.
Charging Recommendations
The NIFTI Sensor Node contains sensitive components, including the battery. Avoid charging the battery in extreme environmental conditions as it may damage or shorten the battery life.
Before charging the Sensor Node, read the following charging recommendations:
- It is recommended to use a 5W charging cable when charging a NIFTI Sensor Node.
- It is recommended to initially charge the NIFTI Sensor Node for 14 hours.
- Subsequent battery charges will require up to 3 hours for a full charge.
- Extreme cold temperatures can decrease battery life. To maximise battery life in cold conditions, keep the Sensor Node in a warm place prior to use.
Update Recommendations
The NIFTI Configuration App will alert the user when a firmware update is required on the connected NIFTI Sensor Node.
Click the provided link in the Configuration app to check for additional software and related data updates.
Cleaning Recommendations
Before installation ensure that the surface is clean from any type of dust or residues to prevent contamination with the adhesive:
- Use 50% IPA and distilled water as the cleaning solution for NIFTI Sensor Nodes.
- For the installation location it is highly advised to consult with authorised personnel of the cleaning solution that is to be used.

